Introduction
Welcome to the QtRvSim User Manual.
QtRvSim is a graphical simulator designed to support learning the fundamentals of computer architecture using the RISC-V instruction set. It provides an interactive environment for writing, assembling, and simulating simple RISC-V assembly programs. By visualizing instruction execution on different processor models, QtRvSim helps make abstract computer architecture concepts clear and tangible.
The project is developed by the Computer Architectures Education project at Czech Technical University and souce code is available on GitHub.
Key Features
- Visual Datapaths – Observe execution on both single-cycle and 5-stage pipelined processor models.
- Integrated Tools – Write code with the built-in text editor and assemble directly within the simulator.
- State Inspection – Inspect register contents, memory, and cache status in real time.
- Peripheral Emulation – Experiment with simulated devices, including a terminal, LCD, and LEDs/buttons.
- Cross-Platform Support – Available on Linux, Windows, macOS, and via WebAssembly (browser-based).
About This Manual
This manual will guide you through:
- Installing QtRvSim on your preferred platform
- Understanding the user interface
- …
Whether you are a student learning the basics of computer architecture or an instructor looking for an accessible teaching tool, QtRvSim provides an intuitive and hands-on way to experiment with RISC-V systems.
Getting started
System Requirements
QtRvSim is built using the Qt framework and supports multiple platforms. Please ensure your system meets the following minimum requirements before installation.
Supported Operating Systems
- Linux (64-bit distributions with Qt 5.12+)
- macOS (10.10 (Yosemite) or later)
- Windows (Windows 7 or later)
- WebAssembly (Browser-based)
- Modern versions of Firefox, Chromium-based browsers or Safari
Installation
Download the appropriate installation files from the official QtRvSim releases page: https://github.com/cvut/qtrvsim/releases
WebAssembly
Just open comparch.edu.cvut.cz/qtrvsim/app in your web browser to run QtRvSim without any installation.
Linux Installation
Choose the installation method that best suits your distribution:
![]()
Ubuntu 18.04+ and Derivatives
sudo add-apt-repository ppa:qtrvsimteam/ppa
sudo apt-get update
sudo apt-get install qtrvsim
Arch, CentOS, Debian, Fedora, openSUSE, Raspbian/Raspberry Pi OS
- Visit the Open Build Service download page
- Select your specific distribution and version
- Follow the provided instructions to add the repository and install it
Arch Linux (AUR)
You can install QtRvSim from the Arch User Repository (AUR) using an AUR helper like yay:
yay -S qtrvsim
# or
yay -S qtrvsim-git  # for the latest development version
Flatpak (Universal Package)
flatpak install flathub cz.cvut.edu.comparch.qtrvsim
Launch with:
flatpak run cz.cvut.edu.comparch.qtrvsim
NixOS/Nix
Install the package directly from the official nixpkgs repository.
Permanent installation
Add qtrvsim to your configuration.nix file:
environment.systemPackages = [
    pkgs.qtrvsim
];
Temporary usage
nix-shell -p qtrvsim --run qtrvsim_gui
Windows Installation
- Download the Windows archive:
qtrvsim-mingw32-[version].zip - Extract the contents to your preferred location (e.g.,
C:\QtRvSim) - Launch
qtrvsim.exefrom the extracted folder - No additional installation steps required
macOS Installation
Method 1: Disk Image (Recommended)
- Download the macOS disk image:
qtrvsim-macos-[version].dmg - Open the .dmg file
- Drag the QtRvSim application to your Applications folder
- First launch: Right-click the application in Applications, select “Open,” and confirm if prompted by Gatekeeper
Method 2: Archive File
- Download the macOS archive:
qtrvsim-macos-[version].zip - Extract the QtRvSim.app bundle
- Move QtRvSim.app to your Applications folder
- Follow step 4 from Method 1 for first launch
First Launch
When you start QtRvSim, or when you select File > New Simulation, the Pre-sets and ELF File dialog will appear.
This dialog allows you to select a hardware configuration (pre-set) and, optionally, load a program to run.
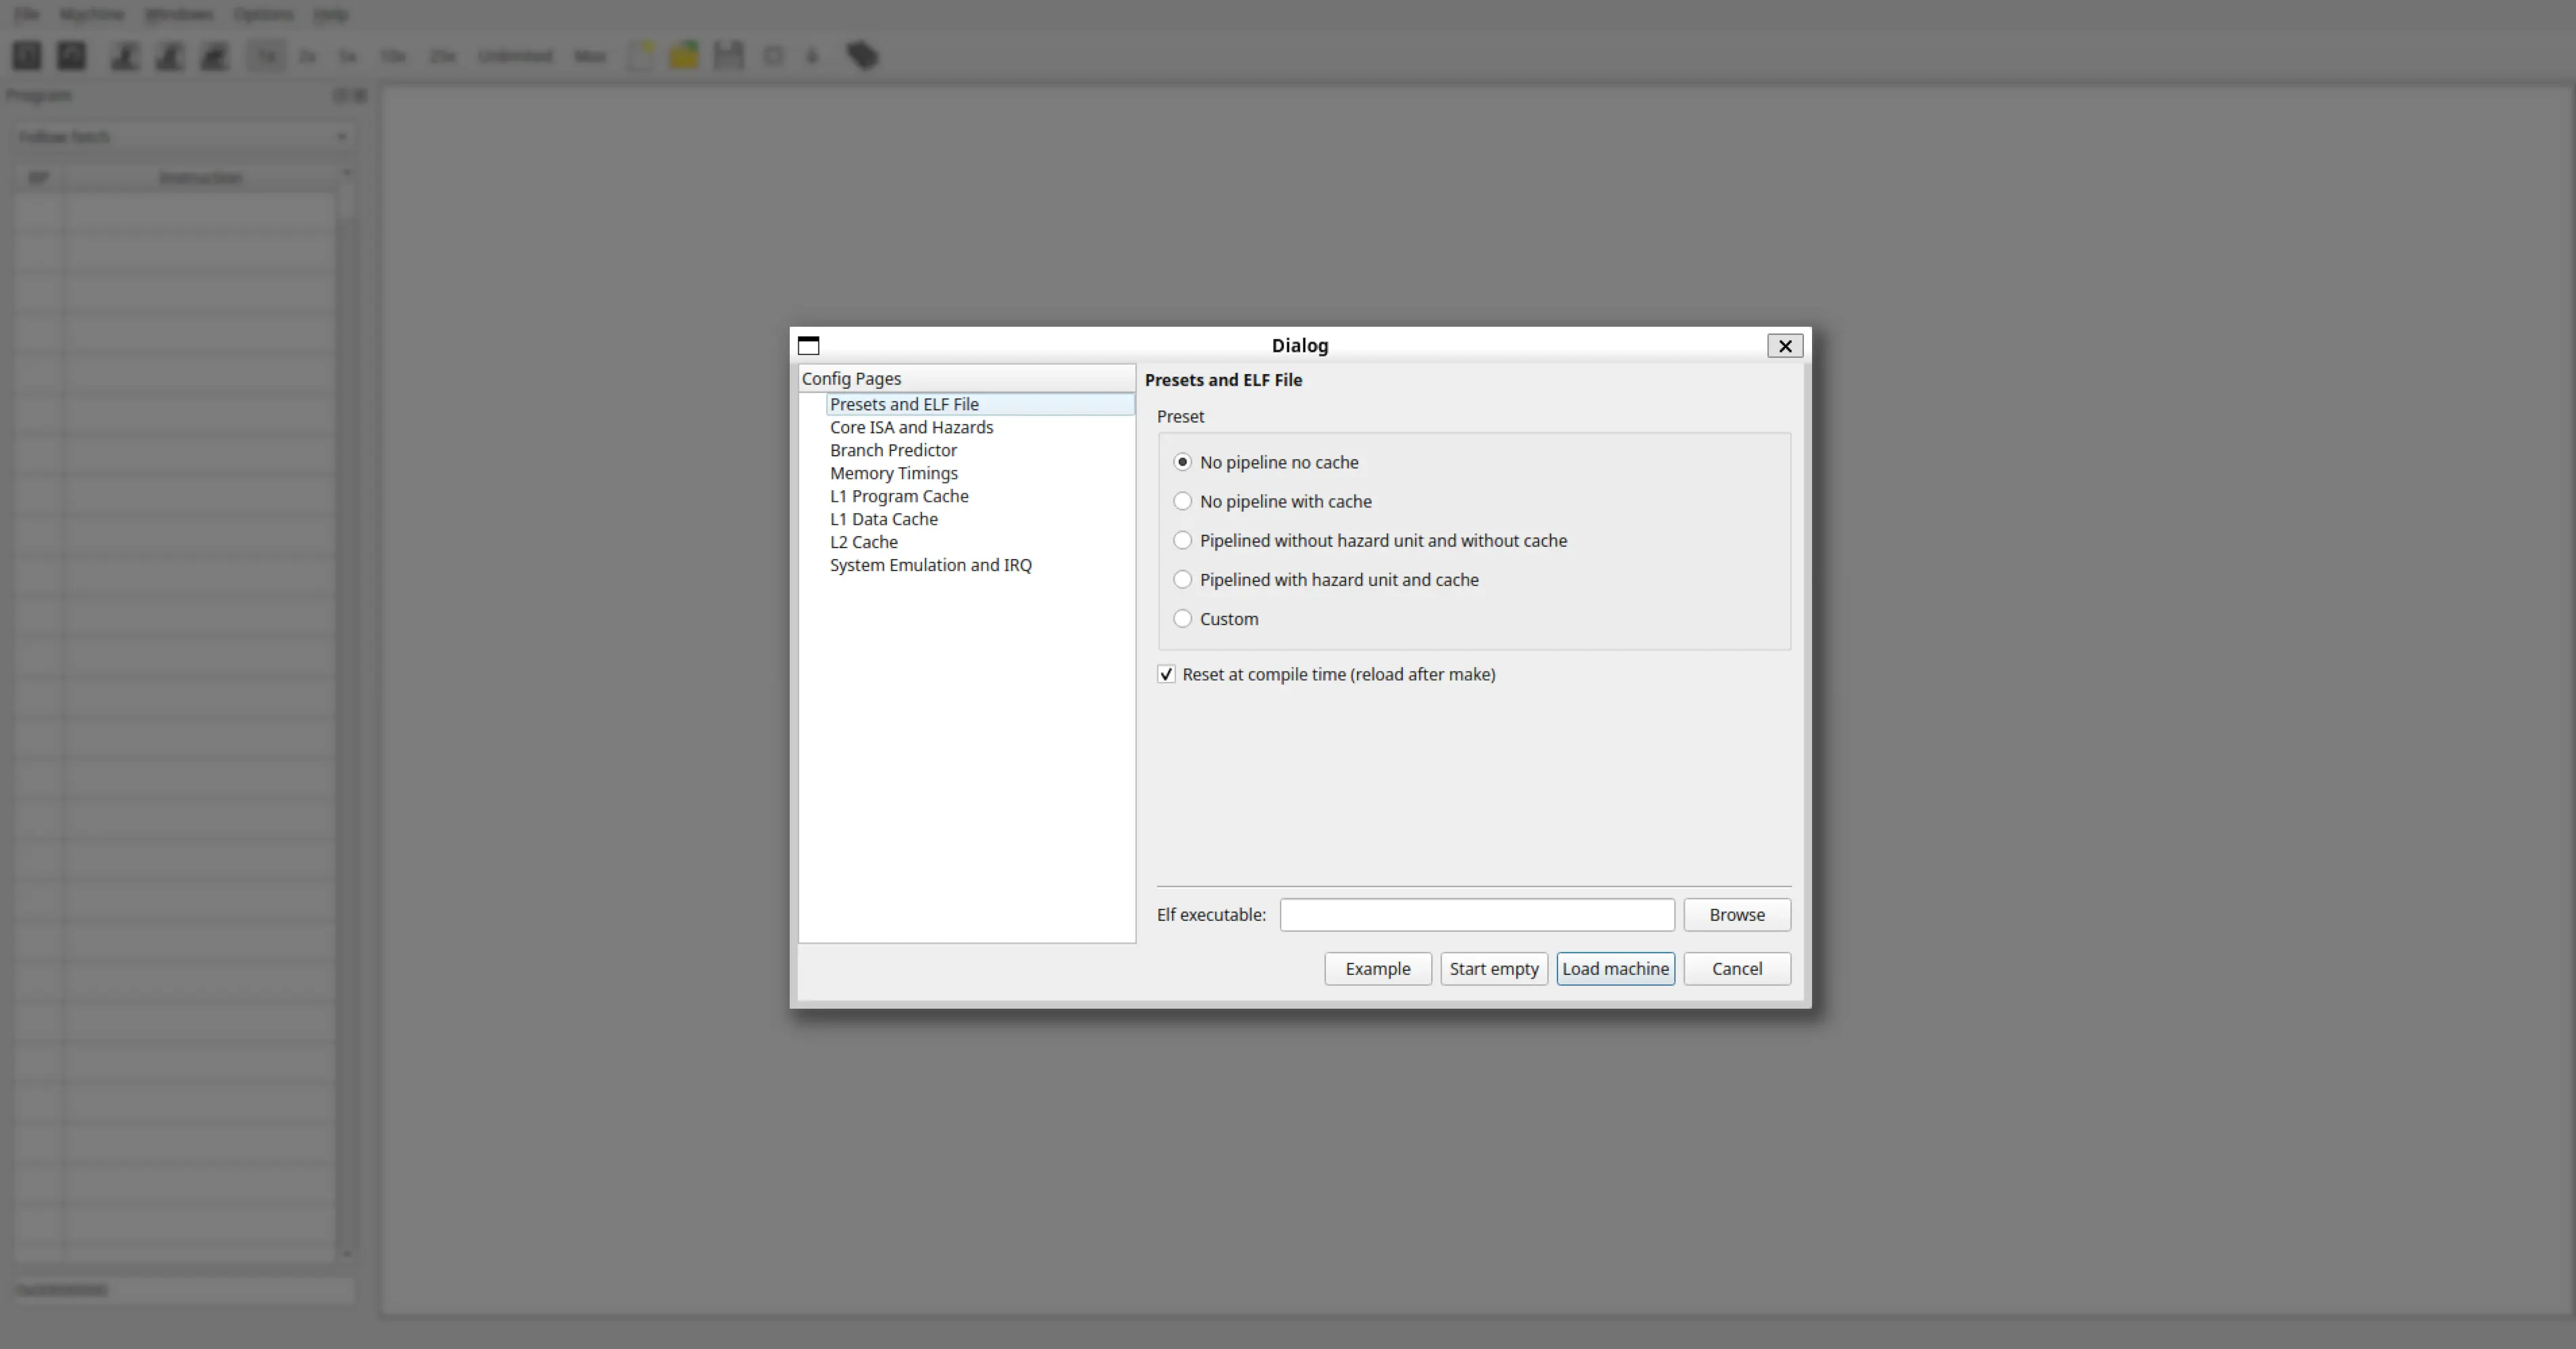
Dialog Options
-
Config Pages (Left Pane) Displays the different categories of hardware settings (ISA, caches, etc.). For now, focus on the Pre-sets and ELF File page. The other pages will be covered in later chapters.
-
Pre-set (Radio Buttons) Choose a predefined hardware configuration:
- No pipeline, no cache: Simplest single-cycle processor model without cache memory. Ideal for learning basic instruction behavior.
- No pipeline, with cache: Single-cycle processor with cache enabled.
- Pipelined, no hazard unit, no cache: Classic 5-stage pipeline without automatic hazard handling. Useful to demonstrate data/control hazards. No cache.
- Pipelined, hazard unit, with cache: More realistic 5-stage pipeline with hazard detection/forwarding enabled, plus caches.
- Custom: Advanced mode – configure settings manually through the other Config pages.
-
Reset at compile time (reload after make) If enabled, the simulator automatically reapplies the selected configuration each time you assemble a program. Recommended: Keep this option checked.
-
ELF Executable Use the Browse button to load a precompiled RISC-V ELF program (
.elf). Tip: For most workflows, you’ll write and assemble assembly (.s) code directly in the editor instead. -
Action Buttons
- Example: Loads a default example assembly program into the editor with the selected pre-set. This is the easiest way to get started.
- Start empty: Opens the simulator with the selected pre-set and an empty editor, ready for you to write or load code.
- Load machine: Applies the selected pre-set and loads the chosen ELF executable.
- Cancel: Closes the dialog without applying changes.
For your first run, we recommend selecting either:
No pipeline, no cache(simplest model), orPipelined with hazard unit and cache(closer to a realistic processor).
Then click Example (to load a sample program) or Start empty (to write your own).
For this manual, we’ll begin with Start empty and the No pipeline, no cache configuration.
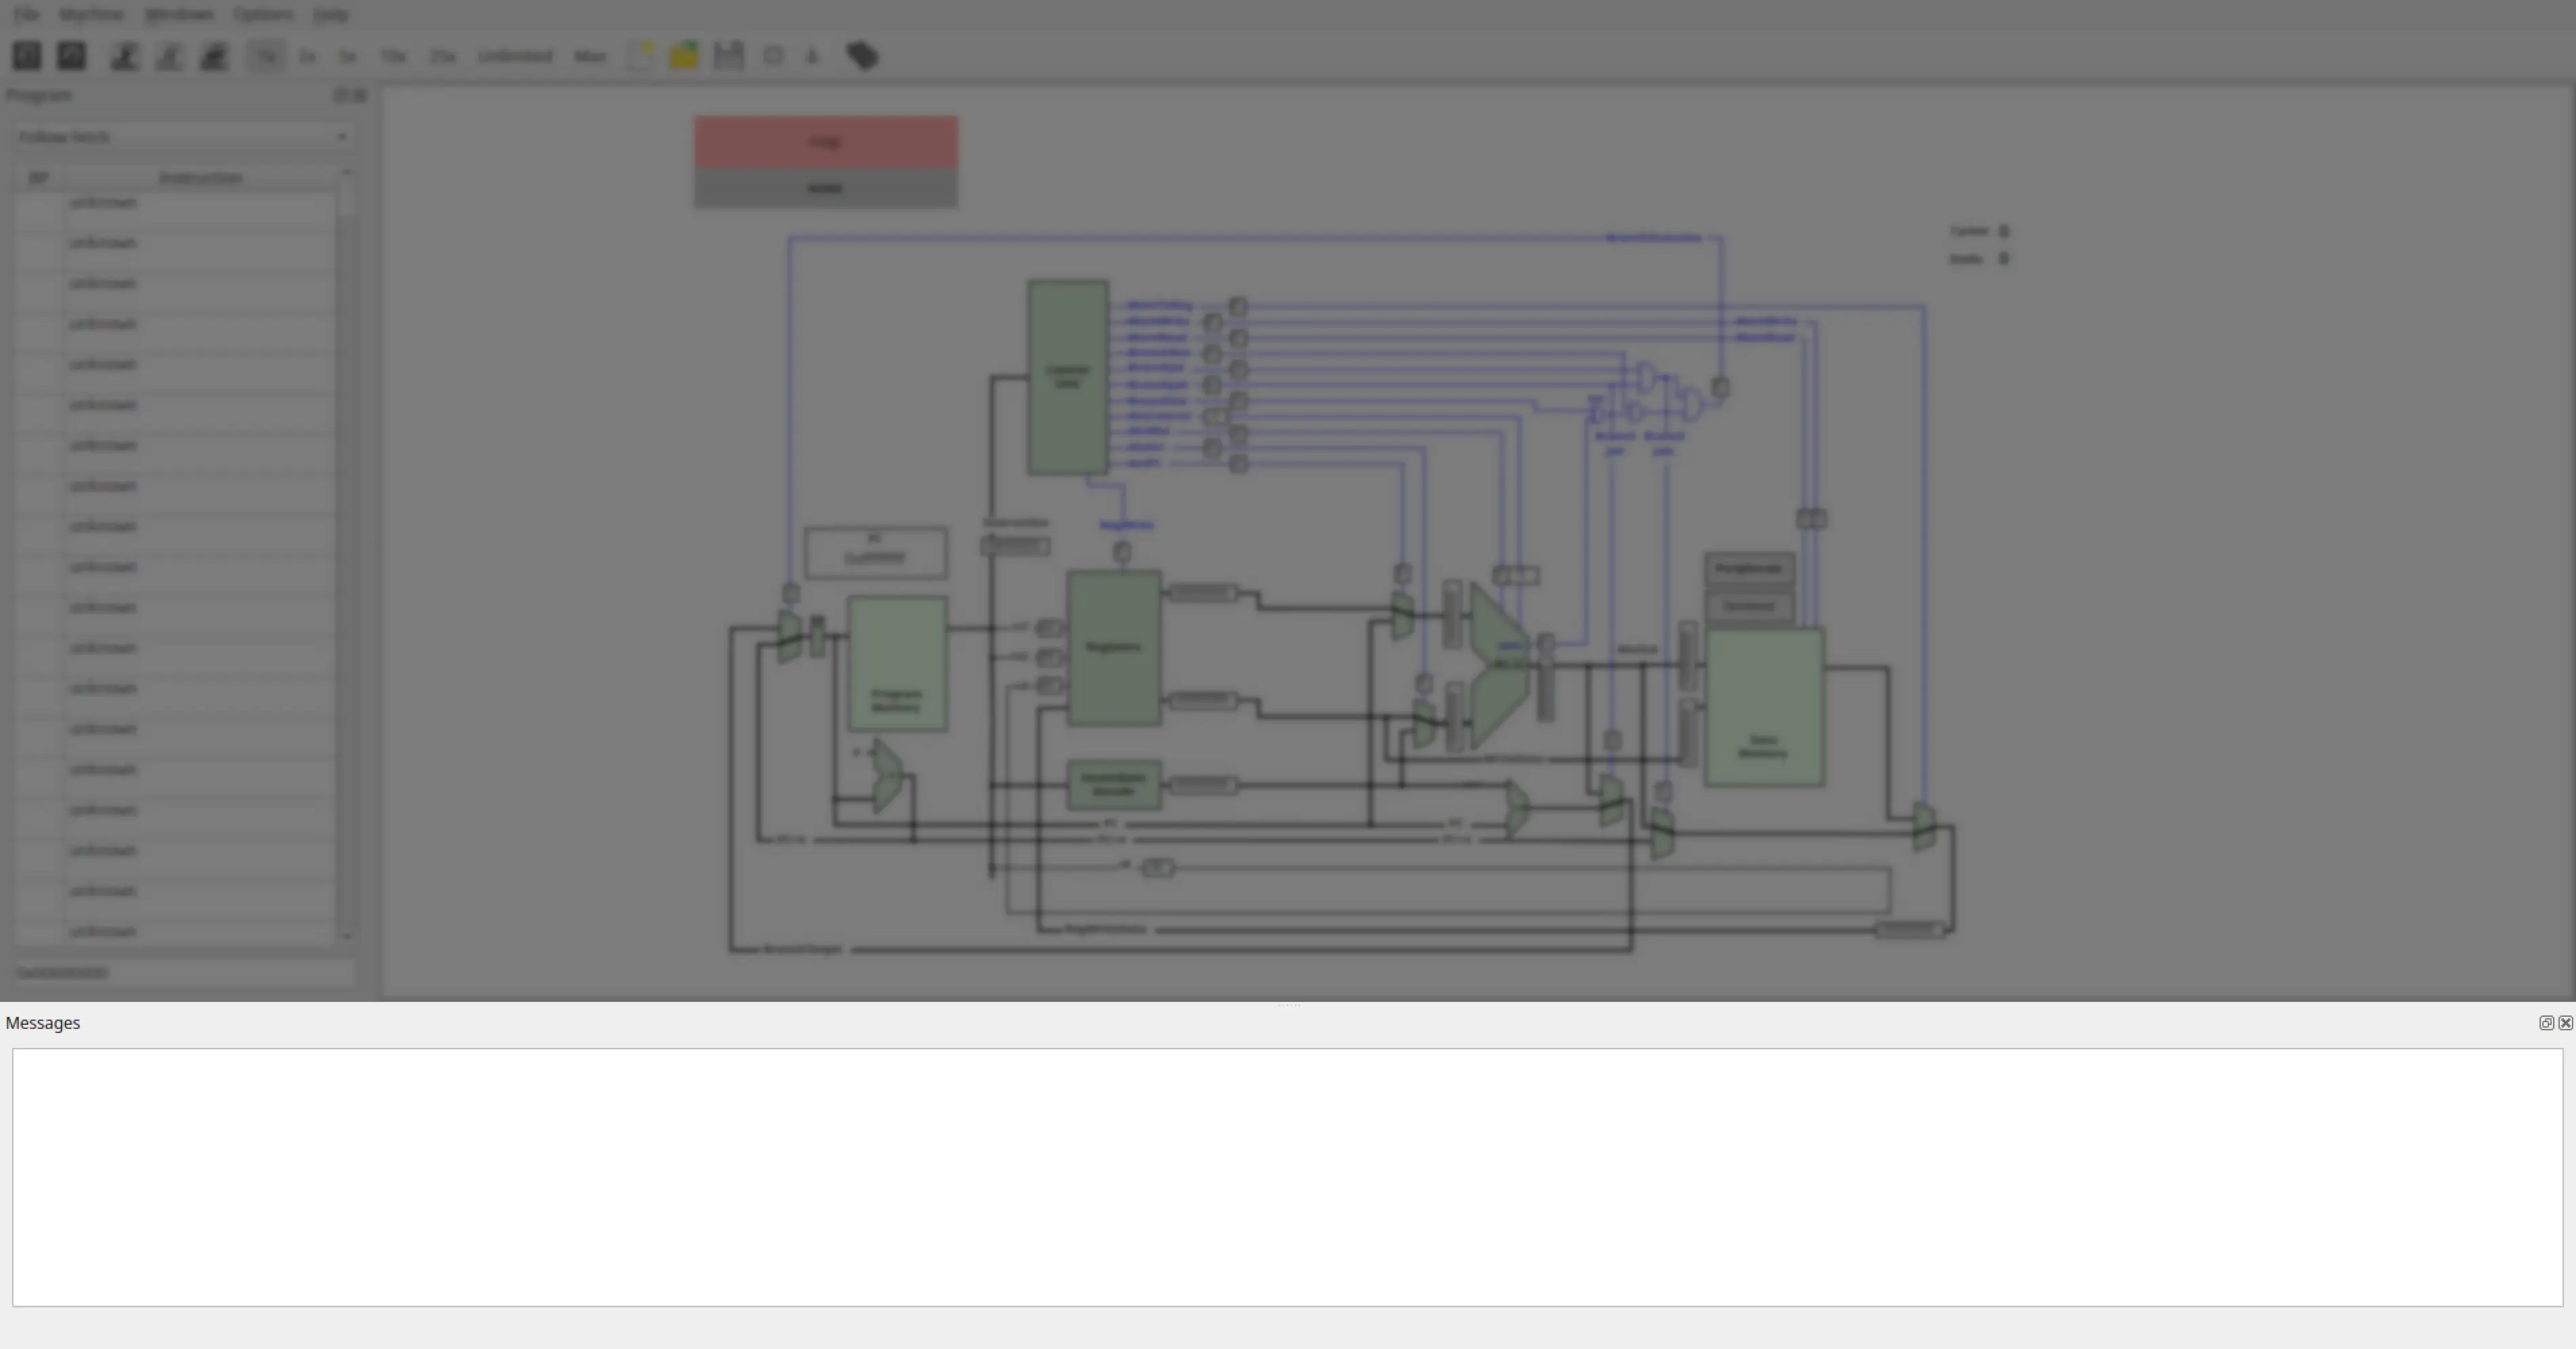
User Interface Overview
After selecting a configuration preset (or loading an example) in the initial dialog, the main QtRvSim window appears.
This chapter introduces the primary functional areas of the interface necessary for basic operation.
 The interface can be divided into five main areas:

1. Menu Bar & Toolbar (Blue Area)
- Located at the top of the window.
- The Menu Bar provides full access to all commands (
File,Machine,Windows, etc.). - The Toolbar below offers quick access to the most commonly used commands via icons.
Key Toolbar Buttons (basic simulation):
 Compile Source – Assemble your code.
 Run – Execute the program continuously.
 Step – Advance execution one instruction (or one cycle) at a time.
 Reset – Reset the simulation state to the beginning.
2. Program Panel (Green Area)
- Toggles via
Windows -> Programor Ctrl+P. - Displays the sequence of assembly instructions for the currently loaded program.
- During execution, the currently processed instruction is highlighted (blue).
- A dropdown menu allows you to follow a particular pipeline stage (fetch, decode, execute, etc.):
- Default: Follow Fetch – ideal to get started.
This panel makes it easy to trace the flow of instructions and observe where execution currently is.
3. Datapath Visualization / Core View (Red Area)
- The central and most distinctive panel of QtRvSim.
- Visually represents the processor’s datapath based on the selected configuration (single-cycle/pipelined).
- Shows how instructions flow through components such as the registers, ALU and memory.
This view makes abstract computer architecture concepts concrete by showing the processor “at work.”
4. Simulation Counters (Purple Area)
- Located in the top-right corner of the window.
- Displays important statistics about the simulation:
- Cycles – Total number of clock cycles since the last reset.
- Stalls – Number of pipeline stalls encountered (in pipelined configurations).
Values update continuously during execution (Run) or after each Step.
Counters reset when you Reset or Reload the simulation.
5. Additional Information Windows
QtRvSim offers several dockable panels to inspect system state in detail.
These can be opened from the Windows menu:

You can rearrange, dock, tab, or float these windows to customize your workspace. Use Windows -> Reset Windows to restore the default layout.
Essential Panels for Beginners:
- Registers (
Windows -> Registersor Ctrl+D) – Displays general-purpose registers x0–x31 and the Program Counter. - Memory (
Windows -> Memoryor Ctrl+M) – Displays the contents of simulated memory. - Terminal (
Windows -> Terminal) – For text I/O when programs interact with the console.
Next Steps
In the following chapter, we will look more closely at the available menus and toolbar options. (If you are just starting out, you may skip ahead to chapter _____ and return later as needed.)
Menus and the Toolbar
Menu Bar
The menu bar provides access to all features of QtRvSim. It is divided into standard menus: File, Machine, Windows, Options, and Help.
File Menu
Handles operations related to simulation setup, source files, and the application itself.
 New simulation… (Ctrl+N)
Opens the Pre-sets and ELF File configuration dialog to start a new simulation.
New simulation… (Ctrl+N)
Opens the Pre-sets and ELF File configuration dialog to start a new simulation.- Reload simulation (Ctrl+Shift+R)
Reassembles the source code currently in the editor and resets the simulation state (registers, memory, cycle count).
- Print (Ctrl+Alt+P) Prints the contents of the active panel or editor.
 New source (Ctrl+F)
Opens a new editor tab to write a fresh assembly program.
New source (Ctrl+F)
Opens a new editor tab to write a fresh assembly program. Open source (Ctrl+O)
Loads an existing RISC-V assembly source file (
Open source (Ctrl+O)
Loads an existing RISC-V assembly source file (.s) into the editor. Save source (Ctrl+S)
Saves the current editor contents. If previously unsaved, behaves like “Save source as.”
Save source (Ctrl+S)
Saves the current editor contents. If previously unsaved, behaves like “Save source as.”- Save source as Prompts for a filename and saves the editor contents to that path.
 Close source (Ctrl+W)
Closes the current editor tab (prompts to save unsaved work).
Close source (Ctrl+W)
Closes the current editor tab (prompts to save unsaved work).- Examples Opens a submenu of example RISC-V programs bundled with QtRvSim. Selecting one loads it into the editor.
 Exit (Ctrl+Q)
Exits the QtRvSim application.
Exit (Ctrl+Q)
Exits the QtRvSim application.
Machine Menu
Controls simulation execution and machine-specific options.
- Run (Ctrl+R)
Starts continuous execution at the configured speed.
 Pause (Ctrl+P)
Halts execution if running.
Pause (Ctrl+P)
Halts execution if running.- Step (Ctrl+T)
Executes only one instruction.
- Speed Controls
Set the execution rate when using Run:
- 1 instruction/s (Ctrl+1)
- 2 instructions/s (Ctrl+2)
- 5 instructions/s (Ctrl+5)
- 10 instructions/s (Ctrl+0)
- 25 instructions/s (Ctrl+F5)
- Unlimited (Ctrl+U) – fastest possible speed
- Max (Ctrl+A) – fastest speed, with reduced GUI updates (higher performance)
- Restart Resets registers, memory, peripherals, and counters to state after the last assembly.
- Mnemonics Registers (checkbox)
Toggle register view to show mnemonic names (
ra,sp) instead of raw (x1,x2). - Show Symbol ? to be added ?
- Compile Source (Ctrl+E)
Assembles source code in the editor using the built-in assembler.
 Build Executable (Ctrl+B)
Builds a standalone ELF file using an external RISC-V toolchain (e.g., GCC/Clang).
Build Executable (Ctrl+B)
Builds a standalone ELF file using an external RISC-V toolchain (e.g., GCC/Clang).
Windows Menu
Manages visibility of all simulation panels.
- Registers (Ctrl+D) – Register state viewer.

- Program (Ctrl+P) – Code view with current instruction highlighting.

- Memory (Ctrl+M) – Memory contents.

- Program Cache (Ctrl+Shift+P) – Instruction cache visualization (if enabled).

- Data Cache (Ctrl+Shift+M) – Data cache visualization (if enabled).

- L2 Cache – Second-level cache view (if enabled).

- Instruction TLB – Displays instruction TLB entries (if configured).

- Data TLB – Displays data TLB entries (if configured).

- Branch Predictor – Displays prediction tables and data (if configured).

- Peripherals – Container for simulated I/O devices.

- Terminal – Simulated serial terminal.

- LCD Display – Simulated LCD.

- Control and Status Registers (CSR) (Ctrl+I) – CSR panel.

- Core View – Datapath visualization (CPU core).

- Messages – Log and feedback panel.
- Reset Windows – Restores all panels to their default positions.
Options Menu
- Show Line Numbers (checkbox) – Toggle line numbers in the code editor.
Help Menu
Provides information about QtRvSim, version details, and licensing.
Toolbar

The toolbar provides quick access to frequently used actions:
- New Simulation – Equivalent to File → New simulation… (Ctrl+N).
- Reload – Resets simulator state (equivalent to Machine → Restart).
- Run – Start program execution (Ctrl+R).
- Pause – Pause execution (Ctrl+P).
- Step – Execute one instruction (Ctrl+T).
- Speed Controls – Select execution speed (same as Machine → Speed Controls).
- New Source – Open a new editor tab (Ctrl+F).
- Open Source – Load an existing
.sor.elffile (Ctrl+O). - Save Source – Save current file (Ctrl+S).
- Close Source – Close active code editor tab (Ctrl+W).
- Compile Source – Assemble current RISC-V program with the built-in assembler (Ctrl+E).
- Build Executable – Build ELF with external RISC-V toolchain (Ctrl+B).
Next Steps
The following sections introduce machine configuration options in QtRvSim, including cache, branch prediction, and virtual memory settings.
Users who are primarily interested in running simulations may skip this chapter and return later when advanced configuration is needed.
Machine Configuration
Machine Configuration
QtRvSim allows different processor configurations to be selected through a configuration dialog window. This dialog is shown at application startup and can also be reopened when restarting the simulated machine.
The configuration defines key properties of the simulated system, including enabled hardware features and their parameters. These settings determine the initial state of the simulator before execution begins.
Virtual Memory Configuration
 The virtual memory configuration section allows users to configure Translation Lookaside Buffer (TLB) parameters for the simulated machine.
The configurable parameters include the number of TLB sets, associativity, and the replacement policy used for TLB entry eviction.
Writing Programs
This chapter covers how to write and run RISC-V assembly programs in QtRvSim.
Using the Built-in Assembler
QtRvSim includes a built-in assembler that can compile RISC-V assembly code directly within the application:
- Write your assembly code in the editor
- Click Compile Source (Ctrl+E) to assemble the code
- The program is loaded into simulated memory and ready to execute
This is the recommended workflow for learning and experimenting with RISC-V assembly.
RISC-V Register Reference
RISC-V has 32 general-purpose registers. The simulator supports both numeric names (x0–x31) and ABI mnemonic names:
| Register | ABI Name | Description |
|---|---|---|
| x0 | zero | Hard-wired zero |
| x1 | ra | Return address |
| x2 | sp | Stack pointer |
| x3 | gp | Global pointer |
| x4 | tp | Thread pointer |
| x5–x7 | t0–t2 | Temporary registers |
| x8 | s0/fp | Saved register / Frame pointer |
| x9 | s1 | Saved register |
| x10–x11 | a0–a1 | Function arguments / Return values |
| x12–x17 | a2–a7 | Function arguments |
| x18–x27 | s2–s11 | Saved registers |
| x28–x31 | t3–t6 | Temporary registers |
Toggle between numeric and mnemonic names via Machine → Mnemonic Registers.
Simple Assembly Program Template
Here is a minimal RISC-V assembly template for use with the built-in assembler:
.globl _start
.text

_start:
    # Your code here

    # Example: Load immediate values
    li a0, 42          # Load 42 into a0
    li a1, 10          # Load 10 into a1
    add a2, a0, a1     # a2 = a0 + a1

end:
    ebreak             # Stop execution
    j end              # Loop forever if continued
The ebreak instruction triggers a breakpoint exception, which causes the simulator to pause execution.
Breakpoints and Debugging
Software Breakpoints
The ebreak instruction causes the simulator to pause execution. This is useful for stopping at specific points in your program:
    # ... some code ...
    ebreak           # Pause here
    # ... more code ...
When ebreak is encountered, the simulator stops. You can then inspect registers and memory, and continue execution with Step or Run.
Hardware Breakpoints
You can also set breakpoints directly in the QtRvSim interface:
- In the Program panel, click on the address or instruction where you want to break
- The simulator will pause when that instruction is fetched
Loading Programs
There are several ways to load programs into QtRvSim:
- Built-in editor: Write assembly in the editor and compile with Ctrl+E
- Open source file: Use File → Open Source to load a
.sfile, then compile - Load ELF: In the launch dialog, use Browse to select a precompiled
.elffile - Build Executable: Use Machine → Build Executable (Ctrl+B) to compile using an external toolchain
Next Steps
Once you’re comfortable writing basic assembly programs, you may want to explore:
- Using an external RISC-V toolchain for compiling C programs or more complex projects
External Toolchains
For more complex programs or C code, you can use an external RISC-V cross-compiler toolchain instead of the built-in assembler.
Installing the Toolchain
Ubuntu/Debian:
sudo apt install gcc-riscv64-unknown-elf
Fedora:
sudo dnf install riscv64-elf-gcc
Arch Linux:
sudo pacman -S riscv64-elf-gcc
macOS (Homebrew):
brew install riscv64-elf-gcc
Compiling Assembly Programs
To compile a simple assembly program:
riscv64-unknown-elf-gcc -march=rv32i -mabi=ilp32 -nostdlib -nostartfiles -o program.elf program.s
Or for RV64:
riscv64-unknown-elf-gcc -march=rv64i -mabi=lp64 -nostdlib -nostartfiles -o program.elf program.s
The above choice is for basic RISC-V integer ISA with 32 registers.
QtRvSim supports even following extensions:
- M (
-march=rv32im/-march=rv64im) - hardware multiply and divide instructions - A (with M
-march=rv32ima/-march=rv64ima) - atomic operations - Zicsr (with A and M
-march=rv32ima_zicsr/-march=rv64ima_zicsr) support for control registers
The A, M and XLEN should match setting in the Core ISA and Hazards setup dialog tab.
Compiling C Programs
For C programs, you need a minimal startup file and appropriate compiler flags.
Startup code (crt0.s):
/* minimal replacement of crt0.o which is else provided by C library */

.globl main
.globl _start
.globl _heap_stack_start
.globl _heap_stack_end

.text

_start:
        .option push
        .option norelax
        /* set a global pointer to allow access to C global variables */
        la gp, __global_pointer$
        /* it has to be done without "relax", because else it is
         * optimized to a gp register relative operation by linker
         */
        .option pop
        la      sp, _heap_stack_end
        addi    a0, zero, 0
        addi    a1, zero, 0
        jal     main
_exit:
        addi    a0, zero, 0
        addi    a7, zero, 93  /* SYS_exit */
        ecall
        /* catch case when syscalls are disabled */
        ebreak
        j       _exit

.bss

.align 4

/* the area which can be used for a heap from the bootom
 * and stack from the top
 */
_heap_stack_start:
        .skip   16384
_heap_stack_end:

.end
Example C program (hello.c):
#define SERIAL_PORT_BASE   0xffffc000
#define SERP_TX_ST_REG     (*(volatile unsigned *)(SERIAL_PORT_BASE + 0x00))
#define SERP_TX_DATA_REG   (*(volatile unsigned *)(SERIAL_PORT_BASE + 0x04))

void print_char(char c) {
    while (SERP_TX_ST_REG & 0x1);  // Wait while busy
    SERP_TX_DATA_REG = c;
}

void print_string(const char *s) {
    while (*s) {
        print_char(*s++);
    }
}

int main(void) {
    print_string("Hello from QtRvSim!\n");
    return 0;
}
Compilation:
riscv64-unknown-elf-gcc -march=rv32i -mabi=ilp32 -c crt0.s -o crt0.o
riscv64-unknown-elf-gcc -march=rv32i -mabi=ilp32 -O2 -c hello.c -o hello.o
riscv64-unknown-elf-gcc -march=rv32i -mabi=ilp32 -nostdlib -static -T linker.ld crt0.o hello.o -o hello.elf
Linker Script
A simple linker script (linker.ld) for QtRvSim:
ENTRY(_start)

MEMORY {
    RAM (rwx) : ORIGIN = 0x00000000, LENGTH = 64K
}

SECTIONS {
    .text : {
        *(.text)
        *(.text.*)
    } > RAM

    .rodata : {
        *(.rodata)
        *(.rodata.*)
    } > RAM

    .data : {
        *(.data)
        *(.data.*)
    } > RAM

    .bss : {
        *(.bss)
        *(.bss.*)
        *(COMMON)
    } > RAM
}
Using Make for Build Automation
For larger projects, a Makefile automates the build process:
CROSS = riscv64-unknown-elf-
CC = $(CROSS)gcc
AS = $(CROSS)as
LD = $(CROSS)ld
OBJCOPY = $(CROSS)objcopy
OBJDUMP = $(CROSS)objdump

ARCH_FLAGS = -march=rv32i -mabi=ilp32
CFLAGS = $(ARCH_FLAGS) -O2 -Wall -nostdlib -ffreestanding
LDFLAGS = $(ARCH_FLAGS) -nostdlib -static -T linker.ld

SOURCES = crt0.s main.c
TARGET = program.elf

OBJECTS = $(SOURCES:.s=.o)
OBJECTS := $(OBJECTS:.c=.o)

all: $(TARGET)

%.o: %.s
	$(CC) $(ARCH_FLAGS) -c $< -o $@

%.o: %.c
	$(CC) $(CFLAGS) -c $< -o $@

$(TARGET): $(OBJECTS)
	$(CC) $(LDFLAGS) $^ -o $@

disasm: $(TARGET)
	$(OBJDUMP) -d $(TARGET)

clean:
	rm -f $(OBJECTS) $(TARGET)

.PHONY: all clean disasm
Loading ELF Files
To load a compiled ELF file into QtRvSim:
- In the launch dialog, use Browse to select the
.elffile, then click Load machine - Or use Machine → Build Executable (Ctrl+B) to compile and load using an external toolchain directly from the editor
Advanced Configuration
This section covers advanced configuration options for QtRvSim, including environment variables and other settings for power users.
- Environment Variables – Customize simulator behavior through environment variables, including portable application mode.
Environment Variables
QtRvSim supports several environment variables to customize its behavior. These are primarily useful for advanced users, portable deployments, and development purposes.
GUI Configuration
Portable Application Mode
By default, QtRvSim GUI stores application state (window positions, last selected configuration, etc.) using the system’s standard configuration location. To make the simulator fully portable (e.g., running from a USB drive), you can specify a custom configuration file path.
QTRVSIM_CONFIG_FILE
Set this variable to the path of a .ini file where QtRvSim should store its GUI state.
Example (Linux/macOS):
export QTRVSIM_CONFIG_FILE=/path/to/portable/qtrvsim_config.ini
./qtrvsim_gui
Example (Windows):
set QTRVSIM_CONFIG_FILE=D:\QtRvSim\config.ini
qtrvsim_gui.exe
Scale GUi Fonts for Classroom Projector
The fonts can be to small for students to see them from the more distant places or projector resolution can be interpolated or scaled that text in editors and menus is hard to read. The next option allows to scale fonts for the whole application.
QT_SCALE_FACTOR=1.4 ./qtrvsim_gui
Logging
Logging environment variables are primarily intended for development and debugging purposes. For detailed information about available logging options, please refer to the developer documentation.